How to avoid parallax error
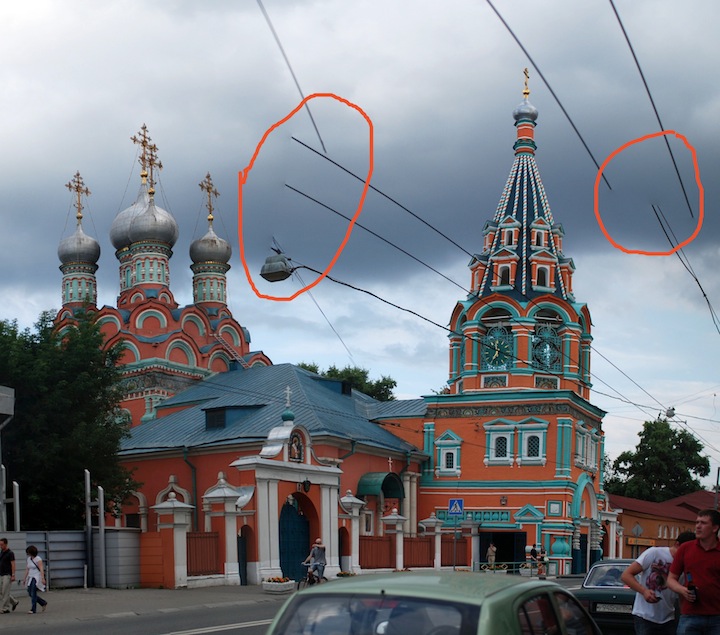
This is an example of a typical misalignment from parallax:
 Figure 1. Source photos for this example were taken from two different viewpoints separated by three meters.
Compare to this:
 Figure 2. Now the photos from the second viewpoint were removed from the set. Some slight misalignments remain, but this is a much better outcome. All photos were taken hand-held for both examples.
Parallax artifacts are difficult to fix in post processing, but, fortunately, they are easy to avoid by properly taking source images for a panorama.
When parallax does not matter
Parallax does not matter most of the time. It becomes an issue only if subjects are close to the camera - indoor and, less frequently, narrow street situations. Usually a simple rotation of the camera around the lens center will make errors negligible even in the tough cases and the rest will be fixed by the deghosting engine. Most of the real misalignments come from ignoring the basics and, say, walking around a building while taking source images. The intension of this article is to show what parallax is and why you ever may need a panoramic head. For example, all sources for panoramas in the gallery were taken handheld without any preliminary calibration.
Parallax and the center of perspective
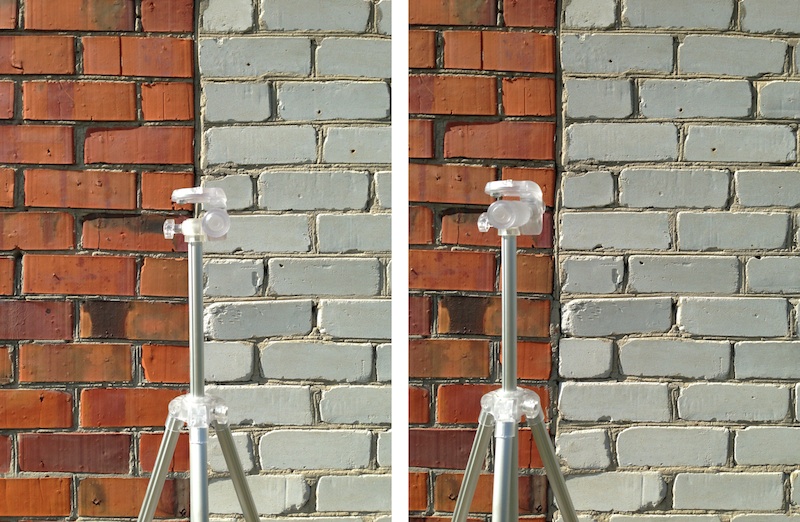
Parallax is a shift in apparent object position while observed from different angles of view. To illustrate what that means, let’s set up a simple experiment. We need a background and a foreground: a wall and a tripod, in our case. Moving the camera slightly to the right shows parallax for the tripod pole - it is easy to see against the differently colored bricks.
 Figure 3. An example of parallax. The camera was moving along the wall. There is a contradiction in appearance between the images: what background should the tripod have in the composite if we try to stitch the images?
A consequence of this to panorama stitching is that foreground and background objects will have a different appearance between frames if the camera moves too much and, thus, will not align well in panorama.
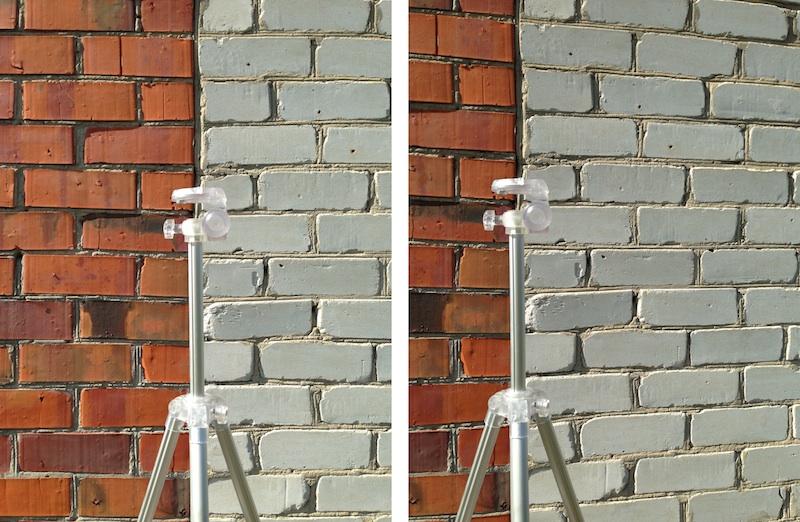
But not every motion results in parallax. The lens geometry indicates that there is a point, called the center of perspective1, rotation around which does not change the relative appearance of objects between frames.
 Figure 4. In this example, the camera was rotated instead of moving along the wall. Thus, a much better alignment of the tripod against the wall is achieved.
So we arrive at this corollary:
To avoid parallax misalignments, the camera motion while taking source images should be constrained to pivot around the lens center of perspective.
Finding the right pivot point
The center of perspective of a lens is located at the entrance pupil - a position of the lens diaphragm as is visible from the front of the lens. Usually it is somewhere in the middle of the lens, though this is not a strict rule. Depending on the optical construction, it may be behind the lens instead. For a more accurate result, one can conduct a simple experiment similar to the above tripod and wall example. One needs to find a point, rotating the camera around without changing the relative position of the background and the foreground objects (like in the figure 4).
A note on using a tripod
A tripod by itself is a solution for a camera shake problem, not for a parallax problem. A tripod mount usually does not coincide with the center of perspective. So, if you want to use a tripod when taking a panorama and achieve a guaranteed parallax-free result, you need to undertake some special measures. One possibility is to use a panoramic head, a device that allows you to set up camera rotation around any fixed point. Calibrating a panoramic head with your camera and lens can be done as described above (the wall and tripod example), this time with the camera attached to a panoramic head.
Another possibility is to use a tilt-shift lens, as tilts and shifts do not change the center of perspective, a very useful feature for stitching.
Summary
To avoid parallax errors, one needs to pay attention to properly taking source images:
- Do not move from one place to another when taking a series of images for a panorama.
- The only motion that will get you a parallax-free image is the rotation around the center of perspective of your lens. Before taking source images, conduct a simple experiment, similar to the above wall and tripod example, to find its position.
- When using a tripod, consider using a panoramic head or a tilt-shift lens for a better result.
- Do not worry about parallax too much. It becomes an issue only things are very close to the camera, not a frequent case for panoramic stitching. And even in that case following the above recommendations you will get good results.
-
Sometimes the point is incorrectly called a nodal point. For a detailed explanation, see this article: Kerr, Douglas A. (2005). “The Proper Pivot Point for Panoramic Photography” ↩
|
Follow @boltnevstudio
Copyright 2010-2022 Alexander Boltnev, Olga Kacher. Privacy policy |
|